
On this page
A wetsuit that fits correctly transforms cold water from an obstacle into a non-factor. A wetsuit that fits poorly will disappoint you regardless of how much you spent on it. This guide covers what to look for, what to avoid, and how to try a suit on properly.
Key Takeaways
- • A good-fitting wetsuit feels like a firm handshake. Snug everywhere with no gaps or pools.
- • The lower back is the best single fit indicator. Pooling there means the suit is too long.
- • Shoulder flex matters most. If you can't paddle freely on land, you won't in the water either.
- • Wetsuit sizing is not standardized. A "Medium" varies by brand. Size to measurements, not letters.
Signs of a good fit
You’ve got the right size when the suit feels snug across the entire body, with no loose pockets and no painful pressure points. Specifically:
- No pooling of fabric anywhere. The lower back, behind the knees, and at the armpits are the most common places for excess fabric to gather. None of those should have slack.
- Snug neck seal. Tight enough that you can’t easily fit a finger between neck and neoprene, loose enough that swallowing and turning your head feel normal.
- Full shoulder range. Arms go straight overhead without the suit lifting the bottom hem or pulling at the chest. If this fails on land, it will fail on every paddle stroke.
- Knees align with the knee pads. When you bend your knees, the reinforced knee panels should land on your actual knees. Not above or below them.
- Wrists and ankles seal cleanly. No gaps, but no painful constriction either. Water should not easily enter when you submerge a hand or foot.
- You can breathe deeply. Wetsuits compress the chest slightly; that’s normal. What’s not normal is feeling winded standing still.

Signs the suit is too big
- Pooling in the lower back. This is the single most common fit problem. When you lean forward or duck-dive, that pocket of fabric fills with water and flushes through the suit. In cold water, this is a deal-breaker.
- Fabric bunching behind the knees. You’ll notice it on day two. By day five you’ll hate it.
- Arms feeling short but torso feeling loose. The suit is meant for someone with a longer torso than you have. Try a “short” variant (MS, LS) from the same brand.
- Neck gap you can easily fit a fist under. You’ll be continuously flushed. Not acceptable for anything below 65°F.
- Cuffs feel loose at the wrists or ankles. Water enters there in volume every time you submerge.
- Chest zip closes too easily with slack. A properly-fitted chest zip takes a real pull to close. If it zips effortlessly with fabric to spare, size down.
Signs the suit is too small
- Can’t get arms fully overhead on land. If the suit is locking your shoulders in place dry, it will be much worse wet. Most wetsuits gain a bit of flex when wet, but not enough to rescue a too-small fit.
- Neck is painfully tight. You can feel your pulse in your throat. Different from a normal snug seal. This is restrictive.
- The chest feels compressed. You can breathe, but not deeply. You’ll hyperventilate on your first duck-dive.
- Visible overstretching. When neoprene is pushed beyond its comfortable stretch, it takes on a slightly glossy sheen and the weave pattern changes. If you see this across the chest, back, or hips, the suit is the wrong size.
- Cuffs cutting into wrists or ankles. Tight enough to mark the skin after ten minutes.
- Knees don’t reach the knee pads. You’re too short for the size. Try a shorter variant (MS, SS) or a size down.
If you wear the suit in the water and surface with red pressure marks anywhere that don’t fade within a few minutes, the suit is too small.
The key fit zones
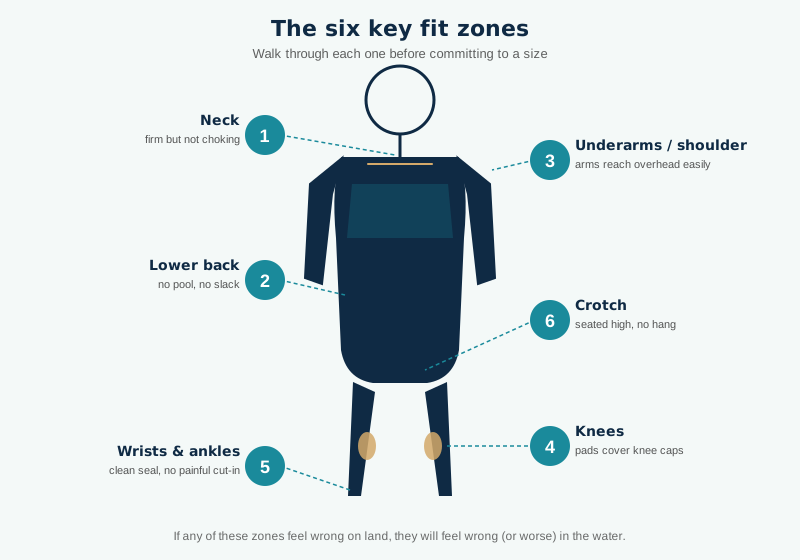
1. Neck
Should feel firm but not choking. You should be able to turn your head, swallow, and tilt your chin to your chest without feeling like the collar is strangling you. The key test: after five minutes of wearing it, you should forget the collar exists.
Neck too loose: Water flushes in every time you submerge your head or the suit shifts. The biggest single cause of cold-water misery.
Neck too tight: Chafing starts quickly, especially with saltwater. You’ll end a session with a burn line.
2. Lower back
The forgotten zone. Look at yourself in a mirror. Or have someone else look. From behind, while you’re wearing the suit. There should be no visible slack across the small of your back.
Pool of fabric here: The suit is too long in the torso. Go shorter (MS variant) or down a size.
Over-stretched here: The suit is too short in the torso. Go taller (T variant) or up a size.
3. Underarms and shoulder flex
Raise both arms straight overhead. The suit should follow your movement without lifting the lower hem or pulling uncomfortably across the chest and back.
Then bring your arms forward as if paddling. The suit should move with you. If your first paddle stroke feels like fighting the suit, every subsequent stroke will too.
4. Knees
Bend your knees to 90 degrees. The knee pads (reinforced panels) should cover your actual knee caps. If they sit above (on your thigh) or below (on your shin), the suit is the wrong length.
5. Ankles and wrists
Run a finger around each cuff. You want a clean seal. No gaps. But not so tight that it cuts into your skin. If you can fit two fingers easily into the cuff, the suit is too loose there.
6. Crotch
Pull the suit up as high as it comfortably goes during the initial dress. A properly-fitting suit will naturally sit snug in the crotch with no hanging fabric. A “low crotch” is a sign the suit is pulled too short overall. Either the torso is too long or the size is wrong.
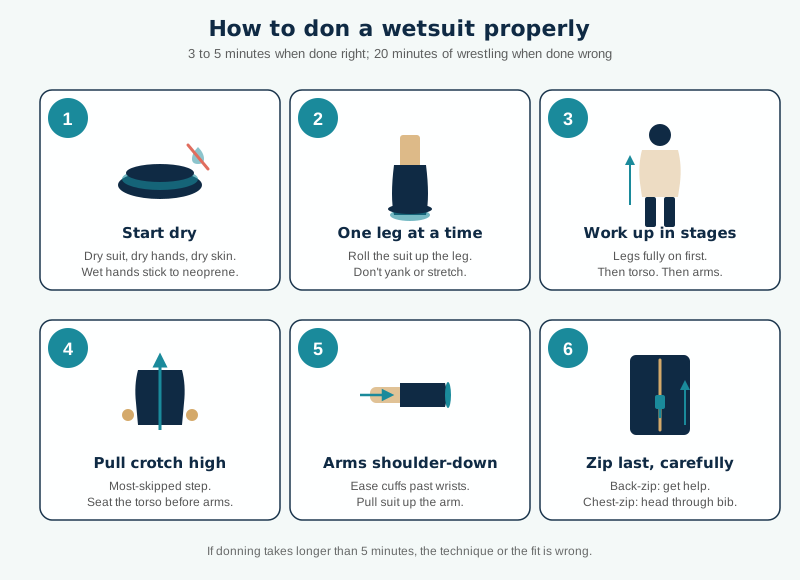
How to try one on properly
Putting on a wetsuit is a skill. Most people don’t do it correctly the first few times. Poor technique makes a good suit feel bad.
- Start dry, with dry hands. Wet hands stick to neoprene. If you must, use thin socks on your feet to help get through the ankle cuffs.
- Go one leg at a time, slowly. Roll the suit up the leg, not stretched tight. Let the fabric gather in your hands so you’re easing it up rather than yanking.
- Work up in stages. Legs fully on before torso. Torso halfway before arms. Don’t try to do everything at once.
- Get the crotch high and the torso fully seated. This is the step most people skip. Before the arms go in, the suit should be pulled fully up, with the shoulder panels sitting where they’ll sit when zipped.
- Arms in from the shoulder down. Ease the cuffs past the wrist, then pull the suit up the arms. Don’t try to yank the cuffs from inside.
- Zip last, carefully. Back-zips need a second person for the initial close; chest-zips close once the head is through the neck bib.
A properly-fitted wetsuit, put on properly, should take 3–5 minutes. If it takes 20 minutes of wrestling, either the technique or the fit is wrong.
Sizing across brands
Wetsuit sizes are not standardized. A “Medium” at O’Neill, a “Medium” at Patagonia, and a “Medium” at Billabong can all fit differently. Sometimes dramatically so.
This happens for two reasons:
- Brands target slightly different body types. Some brands cut suits for a leaner build, others for a more muscular or average build, others for a broader demographic.
- Each brand uses its own measurement bands. The height range, weight range, and chest range mapped to “M” varies between them.
The short version: don’t shop by letter size. Know your measurements and check each brand’s published size chart. Our size calculator does exactly this for the major brands. Enter your height, weight, chest, and waist, and see which size fits each brand’s published chart.
For full context on why sizing varies and how brands compare, see our brand profiles.
What to do when you’re between sizes
Almost every buyer lands between two sizes on at least one brand. Some options:
- Look for a short/tall variant. Many brands offer MS, MT, LS, LT versions of the same size, adjusting torso length while keeping chest width the same. This solves 80% of between-sizes problems.
- Go with the activity. For surfing, err snug. A looser suit flushes more water. For diving, err slightly roomy. Dive suits tolerate a tiny bit of room for tank pads and undergarments. For general use, pick the size that matches your chest and torso best, and accept cuffs that are slightly loose (wrists/ankles matter less than the core seal).
- Try both if possible. If you’re ordering online, check the retailer’s return policy. Order both sizes, try them with the technique above, keep the one that fits, return the other.
Wet fit vs dry fit
Neoprene stretches slightly when wet, and the water layer between suit and skin takes up a tiny amount of space. The practical effect: a suit that feels 95% right on land will feel 100% right in the water. A suit that feels 85% right on land will still feel 85% right in the water. Wet stretch does not rescue a bad fit.
Never buy a suit that’s uncomfortably tight or visibly pooling on the assumption that the water will fix it. It won’t.
When to move on
If you’ve tried the proper donning technique, you’ve tried a short or tall variant, and the suit still has major fit issues. Move on. There are many wetsuits. A suit that doesn’t fit your body right is not the suit for you, regardless of the brand’s reputation or the price tag.
For help picking a different brand, see our complete guide to choosing a wetsuit or our brand profiles. For a shortlist of specific suits matched to your use case and measurements, run the Wetsuit Finder.
Fit first. Everything else follows.
Frequently asked
Should a wetsuit feel tight on land?
Yes. A well-fitting wetsuit should feel like a firm handshake. Snug everywhere with no loose pockets. Before you enter the water. Neoprene stretches a little when wet, and a suit that feels comfortably loose on land will feel like a slow-flushing bathtub in cold water.
How tight is too tight?
If you can't raise your arms fully overhead on land, if the neck restricts swallowing, or if the fabric is visibly overstretched and glossy across any panel. The suit is too small. Slight chest compression is normal; inability to breathe deeply is not.
Can I stretch a wetsuit to fit?
Not meaningfully. Modern neoprene has elastic memory. It returns to its baseline size after use. Suits break in slightly (shoulders loosen up a bit, the neoprene gets more supple), but you can't grow a suit by two sizes. If it doesn't fit in the store, it won't fit next year either.
Do I need a different size in different brands?
Often, yes. A 'Medium' at Rip Curl fits differently than a 'Medium' at Patagonia or Billabong. Each brand publishes its own size chart, and the same body measurements can map to different letter sizes across brands. Our size calculator matches your measurements to each brand's chart individually.
About The WetsuitCenter Team
Our educational articles are reviewed by longtime surfers, divers, and open-water swimmers on staff. We cross-check technical claims against manufacturer specs and published research.
You might also like
Wetsuit Thickness Guide: What Do the Numbers Mean?
The real meaning of 3/2mm, 4/3mm, and 5/4mm wetsuit labels. How thickness distribution works, why it matters, and how to pick the right combination for your water.
How to Choose a Wetsuit: The Complete Guide
A practical guide to picking the right wetsuit: thickness, fit, seams, entry style, and budget. Built for first-time buyers and seasoned cold-water regulars.
How Long Does a Wetsuit Last? (And How to Make Yours Last Longer)
Realistic wetsuit lifespan ranges by quality tier, usage frequency, and care. Signs your wetsuit is done. Plus the habits that meaningfully extend its life.